In addition to the ability to embed images and YouTube videos into WordPress posts via shortcodes, the CyberSEO Pro and RSS Retriever plugins introduce a batch method for adding graphic and video content via the Media enrichment panel.
While this interface allows you to insert media content above and below the post text, and to store image links in the custom “thumb” field, its primary purpose is to facilitate the replacement of images in imported posts. It also allows you to diversify your articles with images generated by AI models (such as Midjourney, DALL-E, Stable Diffusion), whether imported from external content sources (RSS, XML, JSON, CSV, HTML) or created from scratch using text AI models (GPT-4, Gemini Pro, Claude, Mistral Large, etc.).
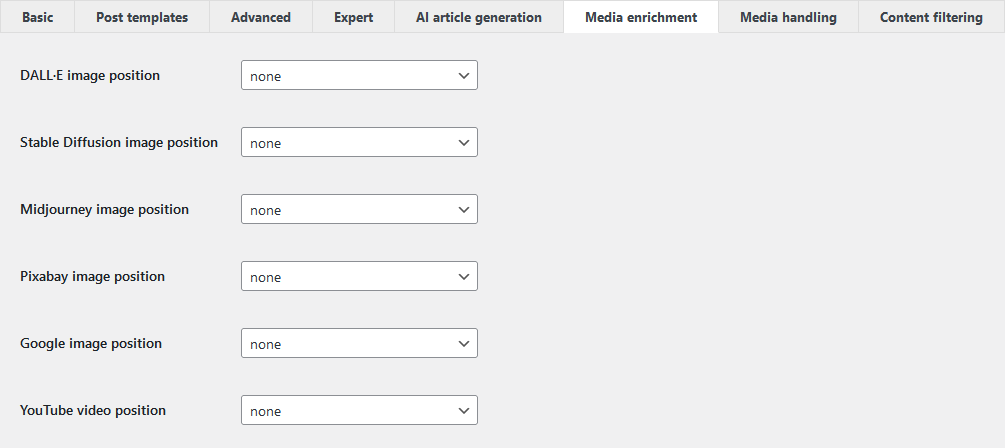
The “Media enrichment” panel supports various strategies for automatically replacing and adding images to WordPress posts generated in this way. Let’s delve into the most obvious tasks related to images generated by neural networks. The options for replacing and adding images can be configured in the “Image Position” drop-down menu, based on the selected AI model.
After selecting the desired model, the first step is to customize the image generation parameters, such as size, style, and CSS class name for embedding in the HTML code of your article. However, the most important and necessary parameter is your prompt, which describes the images to be generated by the selected neural network and inserted into your posts by the plugin.
Text prompts for graphical neural networks are written in plain human language and consist of simple descriptions of the desired images. For example, you might specify:
A Japanese-style illustration of a man holding a sword, featuring anime-inspired character designs, with elements of opacity, translucency, and the artistic influence of the Gutai group, all rendered in a charmingly realistic manner, predominantly in shades of gray and amber.
Or,
A determined and courageous female Jedi navigating a market on Tatooine, clad in a hooded robe.
It’s important to note that your prompts can include placeholders like %post_title% and %post_tags%, which the plugin will automatically replace with the actual elements of the generated post title and tags, respectively:
A sheet of paper emblazoned with ‘%post_title%’ at a bus stop in Tokyo, under spectacular neon reflections.
In addition, your prompts can be formatted in Spintax, allowing you to generate a variety of images with random themes from a single prompt. For example:
{{Majestic|Snowy|Dreamlike} mountains|{Lush|Asian|Winter} forests|Glittering lakes|Desert dunes|Golden sunsets}, featuring {precise details|moonlit landscapes|Pixar style|natural light|stylized illustrations}.
Let’s explore some potential strategies for using the “Media enrichment” panel.
Inserting images into AI-generated articles
Let’s say you create your articles using a text AI model, such as the [gpt_article] shortcode. Since this shortcode generates text-only content in post templates, albeit with rich HTML formatting, the task of enriching it with images falls to you. This is where the “Media enrichment” functionality comes in.
In the “image position” drop-down menu of your selected neural network, select “above content,” “below content,” or “batch insert” to insert an image above the article text, below the article text, or to insert multiple images at different locations within the text.
While the first two options in the “image position” menu are fairly self-explanatory, let’s focus on the “batch insert” option, which you’ll likely use most often in this strategy. When you select this option, you’ll see two additional fields:

The “Number of images” field allows you to specify the desired number of images to be automatically added to each article. The “Insert images before tag” field specifies the HTML tag that will divide the text into sections, between which the neural network generated images will be inserted.
For example, if each section in the plugin-generated articles has a <h2> heading, you’ll probably want to place your images above those sections. Therefore, you should select “h2” as the value for “Insert images before tag”. If your text contains no headings at all and consists only of paragraphs (<p>), it would be logical to insert images between them, so you should choose “p“.
In batch insert mode, the plugin will try to distribute the generated images evenly among the sections you’ve defined. The first image will always be placed above the whole article. The plugin will prevent more than one image from being inserted between two adjacent sections. Therefore, if the number of images you specify exceeds the number of sections found in the text that match your selected tag, only the number of images corresponding to the real structure of the article will be added, i.e. no more than the number of identified text sections.
Replacing images in imported posts
You’ve probably read our articles on rewriting and enriching imported articles, and creating new articles based on the analysis of external content using text AI models. Of course, you may want to automatically replace their illustrations with unique images generated by neural networks such as Midjourney.
The “Media enrichment” panel in the CyberSEO Pro plugin allows you to replace either just the first illustration or all graphic images contained in imported posts. To do this, simply select “replace first image” or “replace all images” from the “image position” drop-down menu of your chosen neural network. The use of Spintax is also highly recommended.
Inserting images into imported posts
You may want to go beyond simply replacing existing graphics in an imported article to removing all existing images, possibly even creating a new article with a different structure than the original, and then inserting the desired number of images into it. In this case, you’ll need the “batch insert” method recommended earlier for use in articles generated from scratch using Text AI models.
At first glance, using the batch insert option seems logical, and it is, but there’s a nuance. The article you are importing may already contain some images. So if you insert new ones, they will simply mix with the existing ones.
To avoid this, you must first remove all existing images from the article using the “HTML tags to strip” option in the “Advanced” feed settings tab. All you have to do is enter the name of the tag you want to remove, which is “img“.

However, you should never remove existing images from imported posts in this way if you plan to use the “replace all images” method described in the previous section. This is critical because attempting to replace non-existent images in the article (those you’ve removed using the “HTML tags to strip” option) will result in an article with no images, since there will be nothing to replace.
Therefore, using “HTML tags to strip” to remove existing images is only necessary if you intend to completely strip the article of graphic content with the goal of later using the “batch insert” method.