
Optimizing the efficiency of your CyberSEO Pro with cron for a reliable feed pulling schedule is highly recommended. It surpasses the “auto” mode in both accuracy and reliability. The “auto” mode relies on the WordPress scheduler and relies on site visits by users or bots, while cron prompts the syndicator at set intervals, ensuring consistent fresh content from your feeds. If cron seems complex or intimidating, don’t worry. This guide is designed to simplify cron and give you the knowledge you need to maximize its use with the CyberSEO Pro plugin.
Cron continues to be an integral part of Unix-like systems like Linux and has been incorporated into numerous software applications, including WordPress. Its importance in automating tasks on Unix-like systems is undeniable. Its benefits reach beyond mere time efficiency. cron brings precision and reliability in task execution, crucial in environments where uniformity is essential. It also aids in resource management by scheduling tasks during periods of low server load.
We’ll walk through the process of setting up a cron job via the command shell on Linux-based machines, as well as on popular website management panels such as Plesk, cPanel, ISP Manager, and shared hosting provider control panels. We will wrap up the discussion by discussing common problems you may encounter and how to troubleshoot them.
Cron Command Line Structure
Before we get into the specific steps for different platforms, let’s take a moment to understand the general process of setting up a cron job. Regardless of the environment, whether it is a command shell or a web-based control panel such as Plesk or cPanel, setting up a cron job typically involves defining two key components: the schedule and the command or script to run.
You’ll also need the appropriate permissions in your system to create a cron job. These permissions may vary depending on your specific server configuration.
Remember, once you’ve set up your cron job, it’s important to verify that it’s running as expected. By testing your cron job, you can identify and fix any potential problems and ensure that your content updates run smoothly.
A cron job refers to a task or a command that the cron utility schedules and executes at specific intervals. These tasks could range from simple commands to complex scripts. The real power of cron lies in its ability to precisely control when and how frequently these tasks are executed. Let’s delve deeper into the structure of a cron job and understand the anatomy of a cron job command line.
Every cron job follows a particular structure defined in the cron table (crontab), which is a text file that serves as the schedule of tasks to be run. Each line in the crontab corresponds to a single job and follows a specific format.
The structure of a cron job line consists of six fields. The first five fields define when the task should run, and the sixth field specifies the command or script to run.
Here is the general syntax:
* * * * * command-to-be-executed
- - - - -
| | | | |
| | | | +----- day of the week (0 - 6) (Sunday=0 or 7)
| | | +------- month (1 - 12)
| | +--------- day of the month (1 - 31)
| +----------- hour (0 - 23)
+------------- min (0 - 59)
- min: This field can hold a value between 0-59, specifying the minute of the hour when the command will be executed.
- hour: This field can hold a value between 0-23, specifying the hour of the day when the command will be executed.
- day of the month: This field can hold a value between 1-31, specifying the day of the month when the command will be executed.
- month: This field can hold a value between 1-12, specifying the month of the year when the command will be executed.
- day of the week: This field can hold a value between 0-7, specifying the day of the week when the command will be executed. Both 0 and 7 represent Sunday.
- command-to-be-executed: This is the specific task or script you want to execute. For CyberSEO Pro users setting up a cron job, the command is displayed as a part of the cron job line beneath the RSS pull mode drop-down menu when “by cron job or manually” is selected. This cron job line appears as follows:
0 * * * * /usr/bin/curl --silent https://yoursite.com/?pull-feeds=xxxxxxxxxxxxxxxxxxxxxxxxxxxxxxxx
Here, the “xxxxxxxxxxxxxxxxxxxxxxxxxxxxxxxx” represents your unique secret security token, included to prevent unauthorized calls by unintended users.
Asterisks (*) in the time and date fields serve as wildcards and mean “any”. For instance, if you want a script to run every day at 5 AM, your cron job timing would be “0 5 * * *”. Here, the asterisks indicate that the task can occur on any day of the month, any month, and any day of the week.
Understanding this structure gives you granular control over the timing of your tasks. This precise scheduling is one of the factors that make cron a powerful tool for automation, including for plugins like CyberSEO Pro.
Setting Up Cron Jobs
Cron jobs can also be configured using website management panels like Plesk, cPanel, and ISP Manager. These panels provide a user-friendly interface to manage cron jobs without dealing with command-line interfaces. Here’s a step-by-step guide on setting up cron jobs in each of these panels.
Using Command Shell
The cron utility is built into Linux-based systems, and setting up a cron job involves creating entries in the cron table (crontab), a file that stores cron jobs for each user on the system. Here’s a step-by-step guide on how to create, edit, and delete cron jobs in Linux.
Creating a Cron Job:
- Open a command shell or terminal session.
- Type
crontab -eto open the crontab file for editing. If this is your first time, it may prompt you to select an editor. Nano is a beginner-friendly option. - Once the editor opens, you can add a new cron job. For instance, to create a cron job that runs a script at 5 AM daily, you could enter:
0 5 * * * /path/to/your/script.sh. - Save and exit the editor. In Nano, this is done by pressing
Ctrl + X, thenYto confirm, and finallyEnter.
Editing a Cron Job:
- Open the crontab file again with
crontab -e. - Navigate to the cron job you want to edit.
- Modify the time fields or the command as needed.
- Save and exit the editor.
Deleting a Cron Job:
- Open the crontab file once more with
crontab -e. - Navigate to the cron job you wish to delete.
- Delete the line containing the job.
- Save and exit the editor.
Here’s a simple template for a cron job command that triggers the CyberSEO Pro Syndicator:
/usr/bin/curl --silent https://yoursite.com/?pull-feeds=xxxxxxxxxxxxxxxxxxxxxxxxxxxxxxxx
Tips and Precautions for Setting Up a Cron Job via Command Shell:
- Always use absolute paths to specify the command or script in a cron job. This ensures that cron knows exactly where to find your script, regardless of the default directory.
- Cron jobs run silently in the background. If you want to check the output, consider redirecting it to a file using
> /path/to/your/outputfile.txt. If you want to append the output to the file, use>> /path/to/your/outputfile.txt. - To catch any errors, you can redirect the standard error output to a file by appending
2> /path/to/your/errorfile.txtto your cron job. - By default, cron sends the output of any job to the email address associated with the user account. If you don’t want this, you can disable it by adding
MAILTO=""at the start of the crontab file. - Before setting up a cron job, test the command or script directly in the command shell to make sure it works as expected.
Remember, with great power comes great responsibility. Cron is a powerful tool, and mistakes in the crontab can cause unexpected issues. Always double-check your entries before saving the crontab file.
Website management panels such as Plesk, cPanel, and ISP Manager are convenient alternatives for setting up cron jobs. These platforms offer intuitive interfaces, eliminating the need to use command-line interfaces. Below, you’ll find a step-by-step guide to creating cron jobs on each of these panels.
Remember, when setting up a cron job through a website management panel, you only need to provide the command-to-be-executed part of your cron job line. For instance, if your cron job line is:
0 * * * * /usr/bin/curl --silent https://yoursite.com/?pull-feeds=xxxxxxxxxxxxxxxxxxxxxxxxxxxxxxxx
The command you’ll input into the website management panel should be:
/usr/bin/curl --silent https://yoursite.com/?pull-feeds=xxxxxxxxxxxxxxxxxxxxxxxxxxxxxxxx
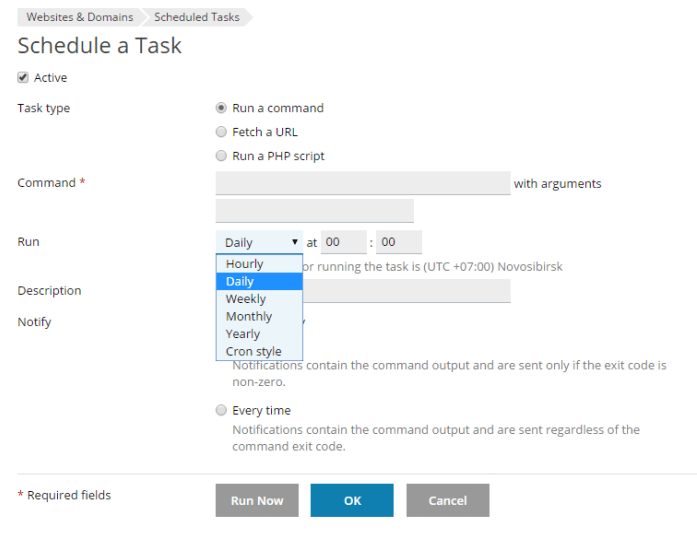
Using Plesk
- Log in to your Plesk panel.
- Go to “Websites & Domains.”
- Click on “Cron Jobs.”
- Click on “Add New Cron Job.”
- Fill in the required details, including the command to run and the schedule (minute, hour, day of the month, month, day of the week).
- Click “OK” to save your changes.
Using cPanel
- Log in to your cPanel account.
- Navigate to the “Advanced” section.
- Click on “Cron jobs.”
- Under “Add New Cron Job,” select the desired schedule. You can use common settings from the dropdown or set custom values.
- In the “Command” field, enter the command or script that you want to execute.
- Click on “Add New Cron Job” to save your new cron job.
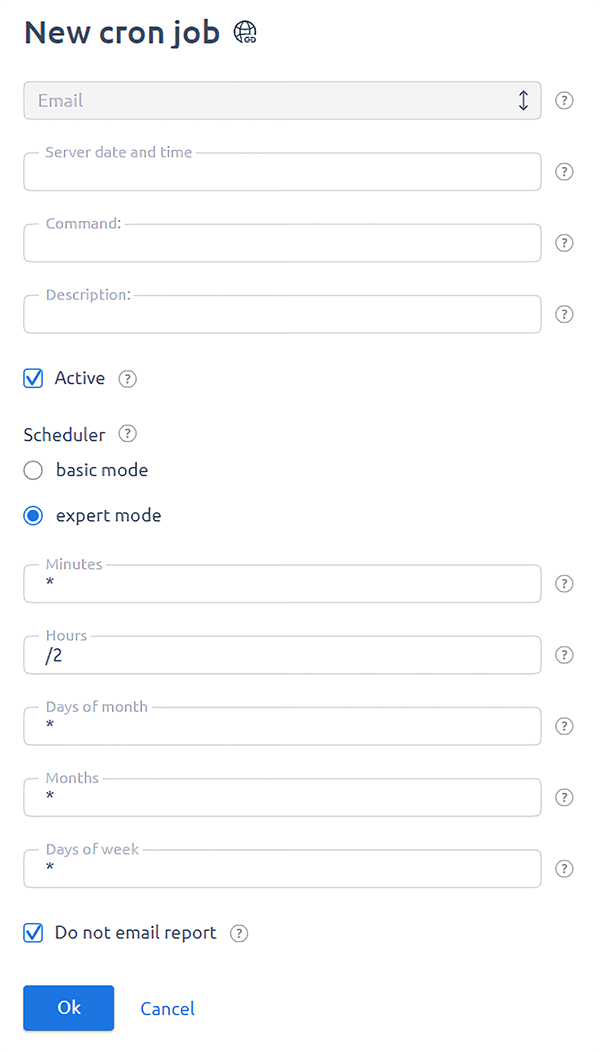
Using ISP Manager
- Log in to your ISP Manager panel.
- Go to the “Tools” section.
- Click on “Task Scheduler.”
- Click on “Add” to create a new task.
- In the “New Task” window, specify the task type as “Cron,” set the time for the task to run, and specify the command or script to be executed.
- Click “Finish” to save the task.
Remember to test the command or script that you want to execute via a cron job, to ensure that it works as expected. Using these management panels makes it easier to set up cron jobs, especially for those who are not comfortable with the command-line interface.
Using Bluehost Control Panel
Since Bluehost is one of the most popular hosting services for WordPress users and is recommended by WordPress.org, it will be used as an example for setting up cron jobs on web hosting platforms. Its user-friendly interface, already familiar to many, simplifies the management of hosting tasks, including the configuration of cron jobs. So let’s go through a detailed guide on how to set up a cron job with Bluehost. Keep in mind that the general principles outlined here apply to many other web hosting services as well.
1. Accessing the Cron Jobs Feature:
- Log in to your Bluehost control panel.
- If you have a Bluerock Account, navigate to the Advanced tab from the side navigation menu to the left, then look for the Advanced section. Click the Cron Jobs icon.
- If you have a Legacy Account, select the cpanel tab from the navigation menu that stretches across the top of your screen. Scroll down and under the advanced section, click the Cron Jobs icon.

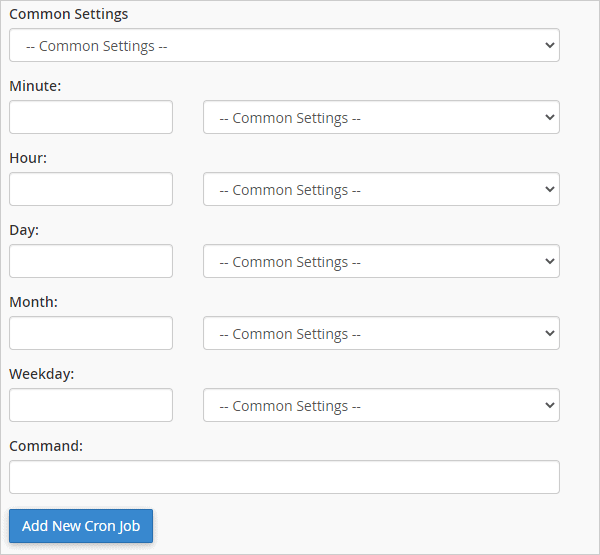
2. Setting Up a New Cron Job:
- Make sure the current email address is valid. This is important because cron jobs by default send their output to the email associated with the account. Enter a new email and click the “Update Email” button if necessary.
- Set the frequency of your Cron Job using the drop-down boxes for each setting, which include: minute, hour, day, month, and weekday. Alternatively, you can use the “Common Settings” drop-down list to choose from a list of regularly used intervals.
- In the “Command” field, enter the cron job command to execute. If you want to execute a script, it should look similar to this:
/usr/bin/curl --silent https://yoursite.com/?pull-feeds=xxxxxxxxxxxxxxxxxxxxxxxxxxxxxxxx - Once you’ve set the frequency and command, click the “Add New Cron Job” button.

3. Managing Existing Cron Jobs:
Existing cron jobs are displayed in the “Current Cron Jobs” table. From here, you can edit or delete them.
- To edit a cron job, locate the cron job you wish to edit and click the “Edit” button. Change the settings as desired and click “Edit Line” to save the changes.
- To delete a cron job, click the “Delete” button next to the cron job you wish to delete. Confirm your decision by clicking the “Delete” button again.
By following these steps, you can automate repetitive tasks and ensure your site runs smoothly and efficiently. Always remember to test your commands or scripts before setting up a cron job to ensure they work as expected.

Setting up and managing cron jobs can sometimes be accompanied by various challenges. However, most issues can be resolved with a bit of troubleshooting. This section outlines some common issues you may encounter when setting up cron jobs for the CyberSEO Pro WordPress plugin, along with a checklist for troubleshooting and some tips for ensuring smooth operation of your cron jobs.
Troubleshooting Common Cron Issues
- The most common issue with cron jobs is incorrect command syntax. This can occur if the command or script path is incorrect, if the wrong flags are used, or if there are syntax errors in your script.
- If the script or command you’re trying to run doesn’t have the necessary permissions, the cron job will fail.
- The environment in which cron jobs run is not the same as your normal shell environment. This may cause issues if your script relies on environment variables or if it requires a specific shell to run.
- If your cron job isn’t running as expected, it may be due to incorrect time settings. Remember, cron uses a 24-hour format, and the time is server time, not local time.
Troubleshooting Checklist
- Make sure your command syntax is correct. Test the command or script manually in the command line to see if it works as expected.
- Ensure that your script or command has the necessary permissions to run. Usually, scripts need to be executable to be run by a cron job.
- Cron logs can provide valuable information on why a job didn’t run as expected. They are usually located at
/var/log/syslog(on Ubuntu) or/var/log/cron(on CentOS). - By default, cron sends the output of a job (and any errors) to the email associated with the account. If there was a problem with a cron job, you might find an error message in your email.
- Remember that cron jobs do not run in the same environment as your shell. If your script depends on environment variables, you may need to set them in the script or in the crontab file.
Ensuring Proper Running of Cron Jobs for CyberSEO Pro
- When setting up a cron job for your CyberSEO Pro WordPress plugin, always use absolute paths. This reduces the chance of a file not being found due to a path error.
- Always test your commands or scripts manually before setting them up as a cron job. This helps ensure they will run correctly when scheduled.
- Setting up email notifications for your cron jobs allows you to be immediately notified if there are any issues.
- Regularly check your cron jobs and their output to ensure they are running as expected. This can help you catch any issues early before they have significant impacts.
Setting up and managing cron jobs is a powerful way to automate tasks for your CyberSEO Pro plugin. With proper testing and monitoring, you can ensure your cron jobs run smoothly and keep your site updated and efficient.